I was jonesing for a kitchen project this weekend so finally tried something on my bucket list: making a sourdough starter from scratch.
Sourdough bread is my absolute favourite, with its chewy moistness and subtle sour aroma. I usually feed my addiction by investing in $5 loaves from some of the Cowichan Valley’s many amazing bakers, but (like heroin) that quickly becomes an expensive habit. So every few years I decide I’m going to bake our own bread. In 2008 that meant adopting Brock’s parents’ breadmaker. I used yeast from a jar and we endured a few of my fresh-and-organic-but-not-as-good-as-store-bread loaves. Once we started going to farmer’s markets regularly we discovered artisan bread, which is usually made with starters and not dried yeast, and we were no longer able to settle for anything less.
in 2011, our Renaissance Women group shortlisted bread-making as a skill we wanted to learn, and some of our members taught us their secrets. These breads involved a yeast starter that had fermented overnight (“poolish”), and a sourdough starter that Tessa had maintained for years after being gifted it by her baking mentor in France. I kept my starter, Sabrina, alive for months, but eventually my daily commuting to work in Victoria made it too difficult to service her needs: living starters need to be fed flour and water at least once a week. Sabrina died a grey, stinky death.
This weekend I atoned for her murder by creating life where before there was none, simply by following the instructions in my much-beloved Joy of Cooking:
- Stir together 1/2 cup flour and 1/4 cup barely lukewarm water in a non-metal bowl.
- Knead or stir it for 3-5 minutes until it is smooth and elastic.
- Cover the bowl tightly with plastic wrap, then poke 5 holes in the plastic with the tip of a sharp knife.
- Let stand away at room temperature away from drafts for 12-15 hours.
After 12 hours the dough looked the same, which is normal. So I stirred in another 1/2 cup flour and 1/4 cup water.
According to Joy of Cooking, my dough should have needed another feeding at 12 hours before resting for 24 hours, but I neglected my starter-in-progress while working and sleeping: about 18 hours later I woke to find my dough bubbling. Yay!!
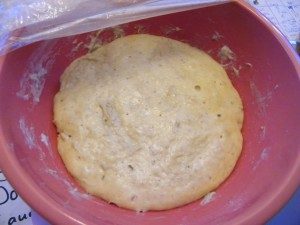
Bubbles mean that my flour + water dough collected enough wild yeast from the air in our tiny house that the yeasts were able to reproduce. As the starter continues to ferment, bacteria will also reproduce and make my starter “sour” (which is what I want, so I can make sourdough).
I took a picture in celebration, then fed my new pet another 1/2 cup flour and 1/4 cup water and covered it with plastic wrap (without holes this time). After one more feeding, my starter should smell slightly sour. It will hopefully have developed enough leavening strength for me to use it to make bread. I will keep my starter in a jar in the fridge, then take her out once a week to feed her and make a few loaves of bread or pizza dough.
Making the bread, of course, is a whole other challenge. I don’t want my starter to die again, but that requires using my starter to make bread at least once a week. Also, my hands are still gibbled from having uber-bad tendinitis this summer, and it is very difficult for me to knead bread properly. Luckily, it’s winter and Brock will be inside more — and he has the hand-strength to knead dough. So maybe our pet starter will prosper until the spring.
But say she does die, or the Apocalypse comes and we can no longer buy dried yeast at Thrifty’s. I now know I can make my own starter using just flour and water. I can make dough bubble, just like my great-grandparents could, before our society decided that individuals didn’t need to be bothered with that knowledge.
Reclaiming that knowledge this weekend tastes as good as the most expensive artisan sourdough bread, oven-warm and buttered.